
M1NI-ITX
Greetings! This page is about my latest computer setup based on the M1 mini-ITX case filled with high performance components.
P.S. There may be some typos and strange sentences, my native language is french. 🙂
Disclaimer: This build guide includes pictures in 3D, viewing instructions at the end.
INTRODUCTION
Feel free to skip the intro! Seriously! And also feel free to post comments in the appropriate section. You can also send me an email.
If you are like me, planning a new build is something very enjoyable. Probably even more when you work hard for your money because usually everything is more planned than instant. So yes, the process of judiciously selecting all the parts one by one, looking at specifications, reading reviews and user experiences, is something very enjoyable. Maybe it has something to do with the fact that it’s like dreaming of the day you receive all the parts, and when that day happens you have that feeling of building the computer of your dream? Compulsive people may not know about this feeling. 😉
Every 4 years I was looking to update my computer, that was until the Core i5-2500K/2600K showed up in 2011. Everything that Intel released after that never justified an update to me. I’ve always been cautious with the budget looking to get the most power for less money and at that time the i5-2500K was a smart choice to me and that was confirmed in the following years.
Today is a bit different though. With the extended delay before an interesting CPU hit the market I was able to save more money to finally once in my life build a high end computer. I’m sure some readers dream of a similar setup today, like I did for years, but just could not afford one at this time. Patience is a virtue! Thanks to the Black Friday I was able to save a few hundreds on that near 3000$ (CAD) build. It’s the first time I spend that much money on a system but as a computer enthusiast I thought it was about time I please myself to a new level. 😀
The M1 already have lots of build guides so I’ll try to focus on one idea I had in mind for a long time and that I’ve never seen anyone use.
COMPONENTS
Let’s go quickly with the parts I really wanted:
CASE: the famous NCASE M1
Always smaller, always more powerful. From ATX, to μATX I was now ready for mini-ITX. I was lusting the M1 for the last 2 years when I began looking for a new setup and up to today I could not find anything else as a better alternative. Cute and functionnal with tons of builds around the web and a great community when looking for help.
CPU: Core i7-8700K
Hell yeah! For the first time I go hyperthreading! Will that make much of a difference? Certainly in some apps. And Intel finally offering 6 cores? About time! Thank you AMD for kicking Intel’s butt! Again will that make much of a difference? I bet that from now on many softwares will have optimizations to better support multi-cores. I mean that’s the future.
Why I didn’t go with AMD? That’s a good question. I just had more confidence in Intel (this inlude CPU/chipset combo) and was ready to pay a bit more for that but I know OTOH that Intel is, how to say that, slightly controlling CPU evolution? We all knew 6 cores for desktop was near, but Intel had this planned a bit later.
CPU cooler: Noctua NH-U9S
The obivous choice to me. I know the C14 was considered good but I’m not in favor of pushing hot air on the motherboard and surroundings. How do you get that air out of the case since it’s going all around? And if you think the other way around, with the fan exhausting on side panel, I have high doubts about air flow because the grill on side panel is more restrictive than the vent holes on the rear, and this also translate to more air friction so more noisy.
There are a few setups with NH-U9S installed vertically but horizontally make it possible to exhaust all air on the back where the vent holes are the largest, and with the idea I had in mind early in my planning, I think it can perform very well. More on that later!
Why not AIO liquid cooler? I was never interested in water, the required maintenance over time, and I know pump can be noisy.
Motherboard: ASUS STRIX Z370-I Gaming
There are 5 mini-ITX Z370 boards available: one from ASRock, ASUS, Gigabyte and MSI have 2. Coming from an ASUS RoG Maximus IV GENE-Z, I simply decided to go with ASUS again.
GPU: MSI GTX 1080 Ti AERO OC
Hell yeah again! 🙂 For the first time I go with the ultimate video card! In the past I was always looking for the best mid-range option like 8800GTS then 660 Ti and I’m pretty sure with a similar budget as in the past a 1060 (where’s the Ti?) would have been my choice but today my budget is different.
My perception with most SFF cases is that exhausting all the hot air when you can is really the optimal option so logically a blower type card is my preference since day 1. Noise? Well let me tell you a fact about my last build. I once bought a first non-blowere card, the MSI 560 HAWK Twin Frozr III and even with the little special switch present on that card set to Silent, the card was insanely loud as soon as I launched the Unigine Heaven Benchmark. It was louder than a blower running at 100%. I tried with case open and same result. After some more testing I could just not keep that card and returned it. Maybe it was defective? Whatever, a few months later I bought a 660 Ti with blower and it was much better. After adjusting the fan curve it was perfect to me with near silent operation.
One reason why I really wanted the MSI AERO is because of the exhaust holes on the back, different from all others. With those huge squares, air have much less restriction than other models and this translate to less noise also. Something often overlooked by many. Test it yourself, just blow air out of your mouth continuously then add a finger at 1 inch of your mouth while still blowing air, you’ll hear what I mean.
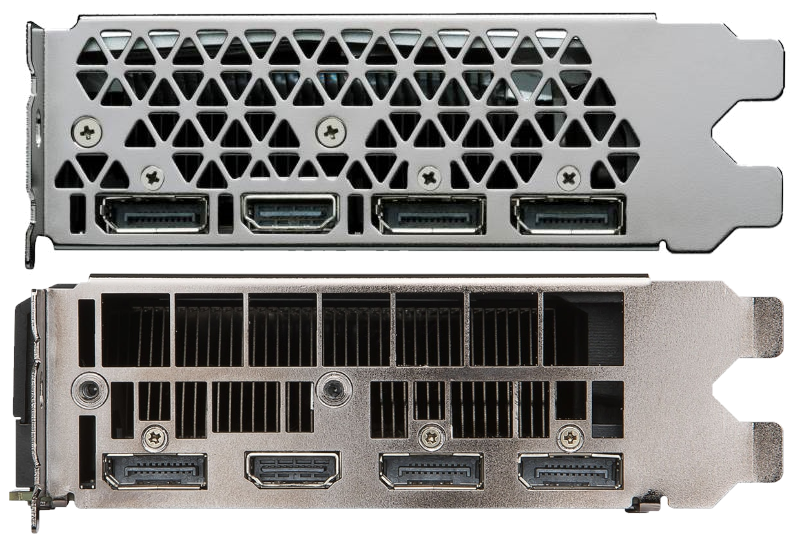 |
| Most 10xx Founders Edition cards have A LOTS of very small triangle-shaped holes like the card above, it’s really not the best option if you’re looking for less noise! The MSI one below is the best Founders Edition blower style you can get if you are concerned about noise. |
BTW with those huge holes I’m not saying it’s a silent card, if fan is running at 100% you will of course hear it but overall noise will be less than competition. And once you define a fan curve you can keep it pretty quiet.
 This is what I currently use.
PSU: Corsair SF600
Adding all the wattage numbers I was getting slightly above 400W on load, and on the graphic card box they say a 600W power supply is recommended, so the Corsair SF600 was the obvious choice and Corsair’s PS have a 0 RMP mode when load is low, cool feature!
SSD: Samsung 960 PRO M.2 NVMe
From HDD to SDD was one hell of a cool upgrade a few years ago. Now I doubt the difference from SATA SSD to NVMe SSD is spectcular even if the numbers are more than doubled but I was able to get a good price. Even thought not the best price I’ve seen on Black Friday (arrgh!) but that’s another story I won’t go into.
If there is one place I could have saved 100$ it’s here. What I mean is there is no difference to be seen from an EVO to a PRO. If half a second on an 8 seconds boot does matter to you then go ahead and as a bonus you will get 2 extra years of warranty and a 12 GB extra space bonus.
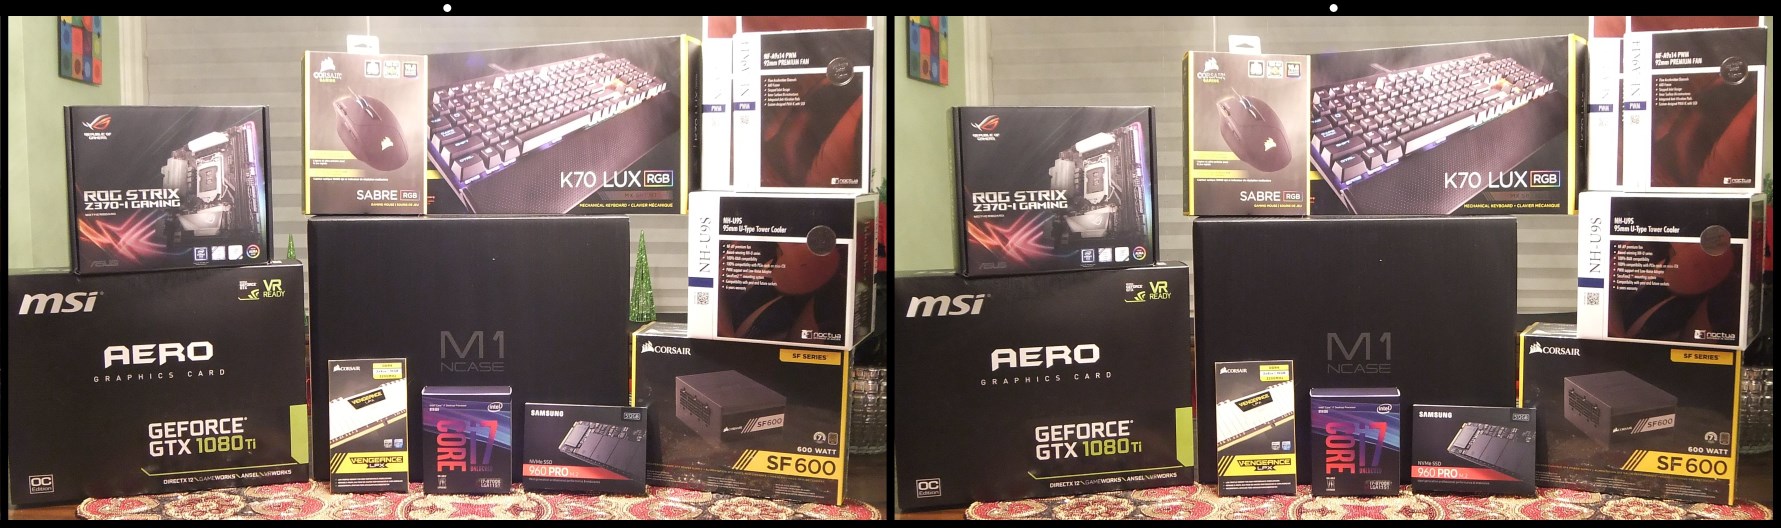
UNBOXING
I won’t go into details here but I had to say that the M1 looks really good and is well built. It comes with lots of extra and this is nice. In Canada this case will cost you a minimum of 300$ CAD, which is quite expensive I must admit but… well I have nothing else to say because I fell in love with it a long time ago. It’s the type of case you want next to you and not hide under a desk.
Then there is the PSU, wow it is so cute! Like a baby power supply! I haven’t expected it to be that small but it’s the first time I see an ITX PS, really a lovely little thing. This is my third power supply from Corsair and kudos to the packaging, always top notch.
Finally it’s a hard to describe feeling looking at the motherboard, pretty much all components have shrinked with years with tiny capacitors and chips, VRMs, etc. Almost a piece of art!
MY CPU HEATSINK IDEA
This is where my setup I believe is unique but I may be wrong. Early on I wanted to duct the CPU heatsink to exhaust all heated air, I even mentionned/suggested it on [H] a few times but AFAIK I’m the first to give it a go. Nothing better than testing my own ideas myself. 🙂
When a single fan push air through the NH-U9S, air exhaust all around because sides are not closed. I wanted to use that feature the other way around, use fan to pull air into the heatsink.
I had 2 options: stick the fan on the heatsink as pull like usually done, or fix it on the case as exhaust and duct to heatsink to pull air through it. I chose the latter because it was much easier to fix the duct to the heatsink than on the case. So attaching the original heatsink fan to the case provided the required support to duct from heatsink to it. For the duct I used what’s called tunnel tape. You’ll see pics in the next section.
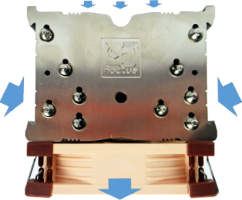
In my book, airflow looks for the shortest path with less restriction. So to make sure most of the air would be passing through all the heatsink and not only coming from the shortest/easiest path from the sides (see image) I bought an extra 92mm slim fan from Noctua, the NF-A9x14 PWM to push air into the heatsink.
It’s important to note that the fan with highest CFM must be the one pulling the air so that way it does not only catch the air coming from the fan pushing air into the heatsink, but will also suck extra air from the sides. I don’t know about other BIOS but ASUS with Q-Fan let me select RPM of all 3 fans in a convenient way to keep everything very silent unless it goes critical. The only setting I don’t like with Q-Fan is the fact the upper limit temperature cannot exceed 75°C and this limit my maximum overclock a bit as you will see later but no big deal for me here. Surprisingly, I’ve read that MSI, Gigabyte and others offer a higher limit but whatever.
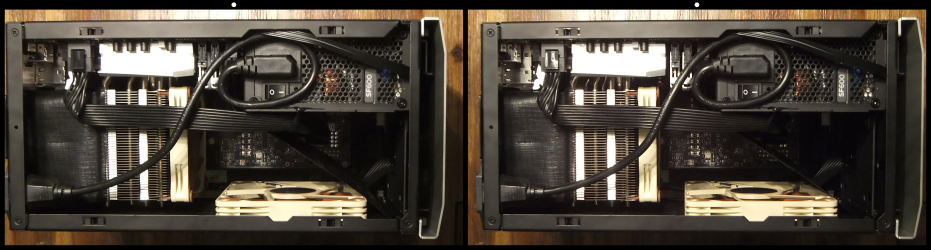
Also, I bought another extra 120mm slim fan from Noctua again, the NF-A12x15 PWM. With no intake fan at all, the air the heatsink would suck would come from everywhere around the case. So now with that extra slim fan I kind of choose where exactly I want the intake to happen, and because of this I’m able to filter the dust a bit more, get it? I’ve added it on the side panel, and to not have air hit a flat surface like the power supply straight ahead, I added a deflector. It’s only a large piece of black tape which you can see in second picture below. That way, airflow is oriented on the heatsink intake fan and also on the motherboard and memory just below. All good! 🙂
INSTALLATION
I first began with the PSU and choose to have the fan face outward to not break the airflow I just explained above. Found out it was pretty easy to arrange the cables that way also.
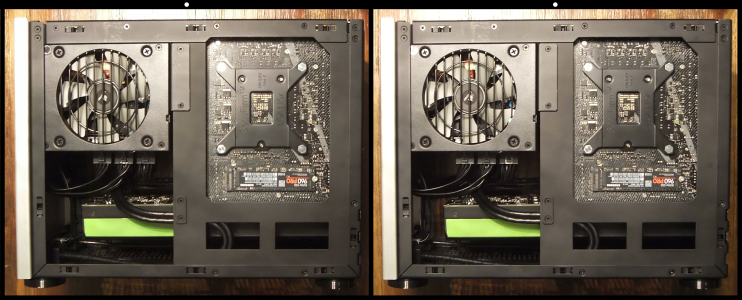
Then I added the CPU on the motherboard, CPU heatsink on top of it and seated the mobo in the case. Now I was able to install the fan as exhaust and attach to it the duct which extend to the heatsink. I should have took a picture when the fan alone was installed, before adding the duct but I’m pretty sure you get it anyway. Adding the duct was pretty easy because both where aligned. I then added the graphic card and a deflector.
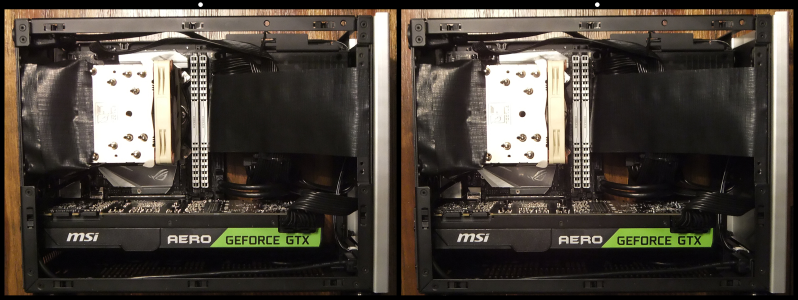
And finally the fan on side panel. You can see both the duct and deflector from another angle here.
OVERCLOCKING
Don’t expect to be overimpressed here, my goal was to run a near silent system with a moderate overclock and I’m more than happy with the result.
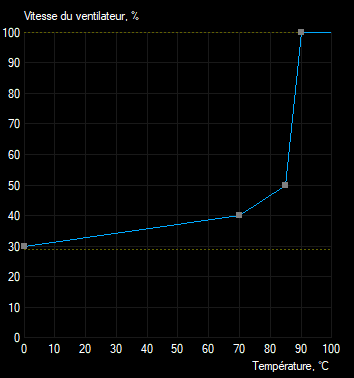
I wanted to use the ASUS Q-Fan utility from the BIOS to control all 3 fans instead of a software like SpeedFan, and because of this you’ll see I was somewhat limited in my overclocking fow now, but again I will say that I’m very satisfied with the end result. The limit comes from the fact the Q-Fan upper limit temperature setting could not be set above 75°C like I said previously and you have to keep in mind that this temperature is the Tcase one, not the Tjunction from the cores. My finding is this translate to about 86°C in RealTemp so that means when a core reached 85°C in RealTemp for more than 10 seconds, Q-Fan would apply the highest %RPM values I defined.
With all BIOS settings at AUTO and with only XMP enabled to use the full 3.2GHz memory speed, my first overclocked boot was done at 5.0GHz for all cores. It was great to finally see a computer running the magic 5GHz number! Out of curiosity I also tested 5.1GHz but without any serious CPU stress test done as I was not interested in that speed with my setup. Remember that I knew from the start I wanted to run cool and near silent. Nonetheless I booted into Windows just fine and ran the built-in CPU-Z stress test with the results shown here.
While 5.0GHz was doing fine with day-to-day tasks, I experienced a crash when stress testing using RealBench 2.44 (version without AVX). I don’t know when I would have experienced another crash just using the computer normally, maybe never, but gaming was in the plan. I could have looked into fixing this quite easily by applying proper overclocked settings but I was not into hardcore overclocking for now. I know this hurts my overclocking skills but the fact is that with the Q-Fan limit I explained before, fans were spinning at the fastest speed I had defined way too early. Again I could have solved this by using a software like SpeedFan but I decided to keep that task for the BIOS with no extra software.
With all this being said, I endend up with a safer and cooler 4.8GHz on all cores with an offset of -300MHz for AVX with all other settings set on AUTO, except XMP like stated before. I have a near totally silent system like I wanted with enough power to do all what I need for many months to come.
As you see it’s obvious I could do better! Water cooling would help but I’m not interested at all in this. Also I know delidding would give lower temperatures and have it run 5.1GHz and maybe 5.2GHz but do I really care for an extra 200 or 300MHz? Not at all! I’m not the type of guy always looking to squeeze the last MHz out of the CPU/GPU. That does not mean I won’t look to hit 5GHz later on, but for now I see no reason to spend time on this.
3D PICTURES
Maybe it’s a first, being a passionnate of 3D I wanted to share 3D pictures of my build. Seeing depth in those pictures will reveal a lot more than flat ones. Don’t worry I will tell you how to see those pictures in 3D, that is pretty easy and YES I know that not everyone will be able to see those pics in 3D but I hope everyone interested a bit will at least give it a try, you could be surprised!
To make it easier for you, the pictures are smaller. I made a tutorial video a while back but I think it will be easier for you to follow the instructions right here.
There are 2 pictures side by side. The one on the left is for your right eye, the one on the right is for your left eye. Gotcha? Yes this mean you have to cross your eyes. We all did that when young, no? It’s easier to start with small pictures so if you are on a smartphone now it will be easier than on your 34″ monitor in full screen.
Notice the little white dot above pictures? Start by looking at the top center gap between both pictures and then VERY SLOWLY start crossing your eyes. You will see the 2 white dots and pictures moving and crashing one into the other and that’s exactly what we want, your goal is that both dots and pictures overlap or stack over each other and when perfectly aligned, you brain will catch what’s going on and the magic will happen. With practice, doing this will get easy and will be fast and you’ll endup doing it almost instant.
Page last updated on